Everybuddy Java
Getting Started
|
|
 At this point new users will need to create an account... click on
create account. In this new dialog, enter a username and password for EBJava
to remember your settings by. This name will never be seen by anyone else, it is
only for internal purposes to save your user information. This name can be
anything as long as noone else has chosen it yet. After entering
both a name and password, press create.
At this point new users will need to create an account... click on
create account. In this new dialog, enter a username and password for EBJava
to remember your settings by. This name will never be seen by anyone else, it is
only for internal purposes to save your user information. This name can be
anything as long as noone else has chosen it yet. After entering
both a name and password, press create.
If the name you enter is in use, EBJava will complain. Just enter another one. |
|
The first order of business is to add an account at a messaging service (AIM, ICQ, etc...). Click on menu and select "Add Account".In the new dialog box, enter your screen name and password. Select the type of service from the drop down menu and then click "Add". You may do this multiple times for accounts at different services. The final thing to do is to add buddiess. Click on "Menu" and select "Add Buddy". In the first box, "Buddy name:", enter whatever name you would like for the buddy to be known by. This name is the one that will show up on your list, and has nothing to do with your friend's screen names. In the next box, "ScreenName:", enter the buddy's screen name on a service, and then select that service from the list below. Click add to add the buddy. The fields will be cleared, and you may enter another buddy. Do this as many times as you want, and then click close to stop adding buddies. |
|
At this point, your EBJava account is set up. You may access your EBJava account from any Java enabled computer with web access by loading the applet and logging in. Your service accounts and buddy list will be there no matter where you log in from. |
|
A couple of final points: Buddies can also be added and removed from EBJava through the "Edit Buddylist" choice in the Menu. Highlight a name and click remove to remove a buddy. Clicking add here will bring up the same add window as selecting add from Menu. Also, remember that users will see you as your already existing usernames on the messaging services. For instance, if you add an ICQ account to EBJava, to other users you might as well be logged in to an official ICQ client under that UIN. |
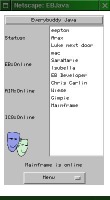 Now that you have an account, log in using your name and password. The main
interface is brought up (left). On the left side of the interface, there is
a list of supported accounts, indicating which are signed on. On the right
side is the list of buddies signed on. Double clicking on one of their names
will bring up a chat window. At the bottom is a button labeled "Menu". Clicking
it will display a list of operations including "Log off".
Now that you have an account, log in using your name and password. The main
interface is brought up (left). On the left side of the interface, there is
a list of supported accounts, indicating which are signed on. On the right
side is the list of buddies signed on. Double clicking on one of their names
will bring up a chat window. At the bottom is a button labeled "Menu". Clicking
it will display a list of operations including "Log off".